I need to capture the technician that is executing the OSD builds and log their name to the registry. There is already a simple HTA in place to allow the technician to change the computer name. I am going to build a new boot WIM in order to support ADSI and update the HTA so the technician is required to supply their username and password before being allowed to continue with the OSD build. The username and password will be authenticated against Active Directory and if successful it will gather the technicians name and place it in the registry. There are other solutions that can be used to accomplish the same goal such as PowerShell but in this case I am going to use what we already have in order to accomplish the task. I am currently using System Center 2012 SP1 CU3 which requires the boot image to be created outside the ConfigMgr console if you need to support Windows 8.x. The ADSI package we are going to be using is not included with ConfigMgr. I will be using a third party ADSI package that has been around since WinPE 1.6 and upgraded accordingly.
Prerequisites:
Windows 8.1 desktop
WADK 8.1 (http://www.microsoft.com/en-us/download/details.aspx?id=39982)
High-level Steps:
Create a new boot WIM to support ADSI
Update the HTA to capture the technician’s credentials
Update the Task Sequence to write the technicians name to the registry
Steps:
Download the ADSI package from http://www.deploymentresearch.com/DRFiles/ADSI_WINPE50_Plugin.zip
The readme lists the steps needed to build the new boot image. I will go through the steps from the readme that we need:
1. Extract the Plugin to C:\Plugins\ADSIx64
2. Copy the following files from a Windows 8.1 x64 image/installation to C:\Plugins\ADSIx64
adsldp.dll
adsmsext.dll
adsnt.dll
mscoree.dll
mscorier.dll
mscories.dll
3. From an elevated Windows PE tools command prompt, execute the CreateBootImage_x64.cmd script.
The above three steps will create a boot WIM that we can now import into ConfigMgr. Copy the WIM to your boot image source folder and add it to ConfigMgr. Don’t forget to distribute the boot image to the appropriate DPs.
There are some additional tasks that can be performed on the boot image such as injecting drivers and adding F8 support which I won’t go into, but here are the detailed steps in the URL below:
HTA:
4. Copy the following HTA to a ConfigMgr source folder. Remove .txt from the file.
5. Changes to the HTA:
strDC = “DOMAINCONTROLLER.DOMAIN.COM”
<input type=”text” name=”domain” size=”35″ width=”35″ value=”DOMAIN“>
6. Package and distribute to your Distribution Points
7. Add the HTA to your Task Sequence before the partition steps as shown in the example below
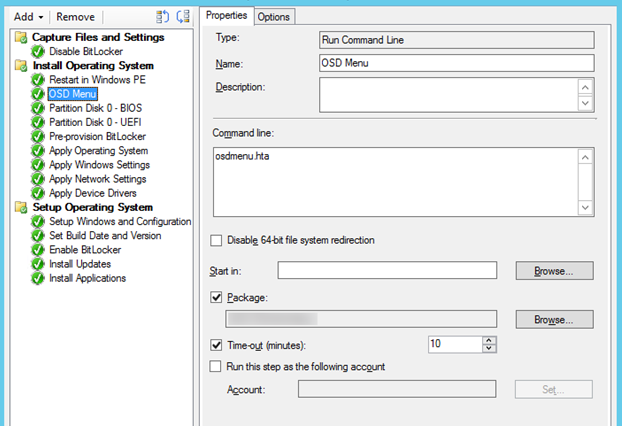
Note: The HTA will gather the information and write the data into OSD Variables that are available throughout the Task Sequence. Once the OS is deployed, the values can be written to the registry later in the Task Sequence.
VBScript:
In order to write the data in the OSD Variables into the registry a VBScript is used. The values will be read from the variables and written into the registry.
8. Save the following script to a file named BuildVersionDate.vbs. Be sure to change Company to a relevant name.
Const HKEY_LOCAL_MACHINE = &H80000002
Set env = CreateObject(“Microsoft.SMS.TSEnvironment”)
Set objShell = CreateObject(“Wscript.Shell”)
Set objReg=GetObject(“winmgmts:{impersonationLevel=impersonate}!\\.\root\default:StdRegProv”)
strKeyPath=”Software\Company”
strValName1=”BuildDate”
strValName2=”ImageVersion”
strValName3=”Tech Name”
strVal1=cstr(now)
strVal2=”Rev x.x”
strVal3=env(“OSDfullname”)
objReg.CreateKey HKEY_LOCAL_MACHINE, strKeyPath
objReg.SetStringValue HKEY_LOCAL_MACHINE,strKeyPath,strValName1,strVal1
objReg.SetStringValue HKEY_LOCAL_MACHINE,strKeyPath,strValName2,strVal2
objReg.SetStringValue HKEY_LOCAL_MACHINE,strKeyPath,strValName3,strVal3
9. Copy the file to a ConfigMgr source folder.
10. Package and distribute to your Distribution Points.
11. Add the script package to the Task Sequence as shown below.
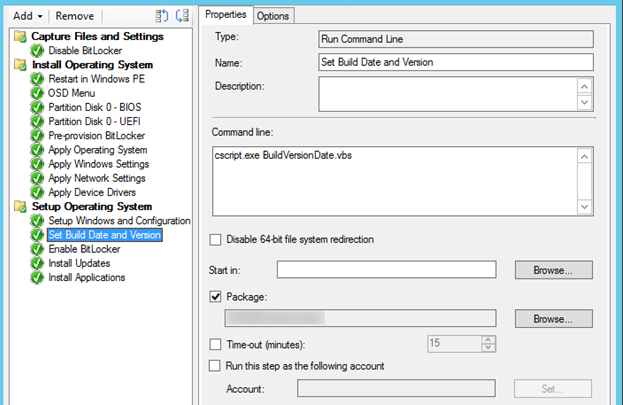
Example:
When the OSD Task Sequence is launched the menu will appear asking for computername, username and password. The username and password will be check against AD and if the password is correct the First and Last name attributer listed on the Active Directory account will be displayed in the Full Name field.
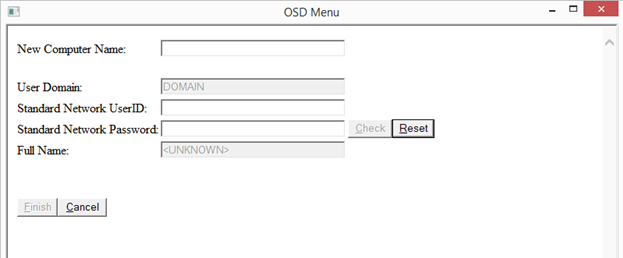
When the check button is pressed the username and password fields will turn green if successful or red if incorrect. If the correct username and password are supplied the Finish button will light up allowing the build to continue.

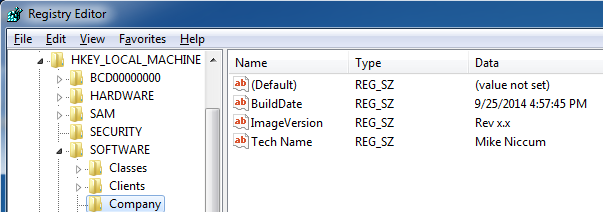
Registry Values:
The following values are written to the registry.