
Virtual Machines have been around since 1960. And Microsoft created Hyper-V which allows you to create them through your Windows machine.
Here are some of the benefits Virtual Machines can bring you.
The Benefits of Virtual Machines
Assist With Software and OS Testing
Virtual machines allow for expanded testing functionality.
- Experiment with multiple different operating systems within the same machine.
- Run software that requires an older version of Windows or non-Windows Operating System.
- Practice navigation of technical commands and processes knowing your data is safe.
- Easy maintenance, application provisioning, availability, and convenient recovery.
Slash Expenses & Increase Productivity and Efficiency
One physical server can transform into many virtual machines providing maximum output for you or your organization. This also means less time spent on maintaining the physical hardware of multiple machines.
Provide Centralized Asset Management
All virtual machines can be managed from one location.
Allow For Disaster Recovery
Virtual Machines can be copied and stored in a different location to use as a backup of your data which provides easy recovery/failover.
Give Flexibility And Personalization
No two environments must be the same with virtual machines. This provides a great amount of flexibility and options for both organizations and individuals.
What Are The System Requirements To Run Hyper V?
There are specific requirements to be able to run Hyper V in Windows 10:
- 64-bit processor
- Windows versions of Pro, Enterprise, and Education.
- 4Gb of RAM (this is the bare minimmum, you’ll likely want much more for the VMs)
- Second Level Address Translation (SLAT)
A good way to find some of this information about your computer is to run a cmd line of: systeminfo.exe
How Do You Set Up Hyper V In Windows 10?
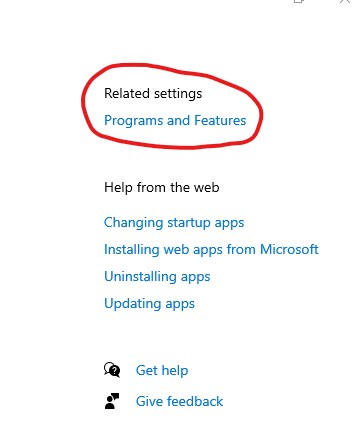
Here’s a step-by-step of how to set up Hyper V in Windows 10 through the Control Panel.
Right click the Windows button and Select ‘Apps and Features’.

Select ‘Programs and Features’ on the right side.
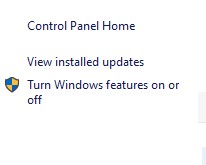
Select ‘Turn Windows Features on or off’.
Select Hyper-V and all the options then click ok.
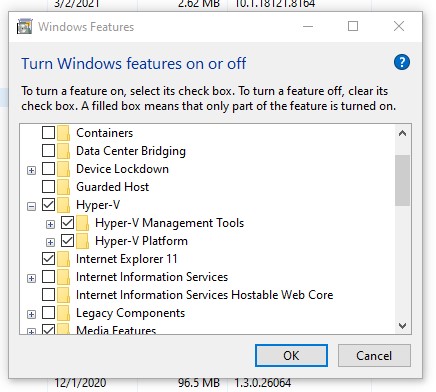
Once you do this, you’ve successfully turned on Hyper V! Your next steps is building out the virtual switch, and building a guest! (We’ll cover those topics later).
Other Helpful Links About Hyper V
Here’s some other helpful documentation related to Hyper V.
https://docs.microsoft.com/en-us/virtualization/hyper-v-on-windows/quick-start/enable-hyper-v
https://docs.microsoft.com/en-us/virtualization/hyper-v-on-windows/reference/hyper-v-requirements
https://docs.microsoft.com/en-us/virtualization/hyper-v-on-windows/about/